- 1/31/2013 04:22:00 pm
- 21 Comments

Endlich ist mein Gesicht wieder so weit abgeschwollen, dass ich das Haus verlassen kann - was für eine Wohltat! Gestern habe ich mich also seit einer Woche wieder mal zurecht gemacht und war unterwegs. Zur Zeit ists auch schön mild, so dass die Winterstiefel zuhause bleiben können!


Finally, the swelling of my face is little enough for me to leave the house again - what a relief! So, yesterday I got ready (it's been a week without that) and was out and about. At the moment it's so nice and mild that the winter boots can stay home!


Cardigan: New Yorker // blouse, belt: Primark // skirt: Ann Christine // tights: Tally Weijl // shoes: hand-me-down from my great-aunt
-Kati
- 1/30/2013 06:31:00 pm
- 47 Comments
Heute gibt's mal wieder ein DIY, dieses Mal basteln wir einen Filzkorb, in den man so allerlei reintun kann. Das Ganze ist ziemlich simpel, deswegen werde ich mich mit Worten stark zurückhalten heute und die Bilder sprechen lassen! Man braucht: Karton, Filz, Stoff, Kleber, Wolle, Nadel und Faden und ein Filzmotiv (zum Schluss habe ich dann doch nicht den Igel genommen).
Today I have another DIY for you, today we'll make a felt basket in which you can put all sorts of stuff. The whole thing is fairly simple, that's why I won't talk so much today and rather let the images speak! You'll need cardboard, felt, fabric, glue, yarn, needle and thread and a felt embellishment (at the end I didn't use the hedgehog).

1. Zwei Pappkreise von gewünschter Korbgröße ausschneiden, zusammenkleben.
1. Cut two cardboard circles in the size you wish the basket to be and glue together.


2. Kleber auf den gedoppelten Kreis auftragen, Stoff drüberlegen (mit Farbfingern, natürlich) und festdrücken. Grob ausschneiden.
2. Apply glue onto the doubled circle, put fabric over it (with paint fingers, of course) and press down. Roughly cut around.


3. Jetzt nach innen falten und festtackern. Die silbernen Tackernadeln mit schwarzem Permanentmarker anmalen, damit sie weniger sichtbar sind.
3. Now fold to the inside and staple. Paint the silver staples with black permanent marker so that they are less visible.


4. Jetzt den Filz abmessen, sodass er einmal um den Kreis herumreicht. Zwei gleiche Teile zuschneiden und zusammenkleben (sorgt für Stabilität). Mit Wolle hübsch zusammennähen.
4. Now measure the felt so that it fits around the circle once. Cut two equal rectangles and glue together (makes for stability). Sew together using yarn.


5. Jetzt den Filzteil mit Nadel und Faden an den Kartonkreis nähen. Geht etwas schwer teilweise, aber durchhalten!
5. Now sew the felt part to the cardboard circle using needle and thread. It is a bit difficult sometimes, but keep going!

Fertig! Ich habe da meine Bikinis drin, so sind sie im Kleiderschrank schön getrennt von allem anderen!
And done! I keep my bikinis in there so that they're nicely separated from the other stuff in my wardrobe!

-Kati
Today I have another DIY for you, today we'll make a felt basket in which you can put all sorts of stuff. The whole thing is fairly simple, that's why I won't talk so much today and rather let the images speak! You'll need cardboard, felt, fabric, glue, yarn, needle and thread and a felt embellishment (at the end I didn't use the hedgehog).

1. Zwei Pappkreise von gewünschter Korbgröße ausschneiden, zusammenkleben.
1. Cut two cardboard circles in the size you wish the basket to be and glue together.


2. Kleber auf den gedoppelten Kreis auftragen, Stoff drüberlegen (mit Farbfingern, natürlich) und festdrücken. Grob ausschneiden.
2. Apply glue onto the doubled circle, put fabric over it (with paint fingers, of course) and press down. Roughly cut around.


3. Jetzt nach innen falten und festtackern. Die silbernen Tackernadeln mit schwarzem Permanentmarker anmalen, damit sie weniger sichtbar sind.
3. Now fold to the inside and staple. Paint the silver staples with black permanent marker so that they are less visible.


4. Jetzt den Filz abmessen, sodass er einmal um den Kreis herumreicht. Zwei gleiche Teile zuschneiden und zusammenkleben (sorgt für Stabilität). Mit Wolle hübsch zusammennähen.
4. Now measure the felt so that it fits around the circle once. Cut two equal rectangles and glue together (makes for stability). Sew together using yarn.


5. Jetzt den Filzteil mit Nadel und Faden an den Kartonkreis nähen. Geht etwas schwer teilweise, aber durchhalten!
5. Now sew the felt part to the cardboard circle using needle and thread. It is a bit difficult sometimes, but keep going!

Fertig! Ich habe da meine Bikinis drin, so sind sie im Kleiderschrank schön getrennt von allem anderen!
And done! I keep my bikinis in there so that they're nicely separated from the other stuff in my wardrobe!

-Kati
- 1/29/2013 04:43:00 pm
- 35 Comments
Ich bin so froh, dass die tolle Kate von Scathingly Brilliant zugesagt hat, bei mir zu posten! Ich lese ihren Blog schon sehr lange, und bin immer wieder begeistert von ihren pastelligen Outfits und tollen Zeichnungen!
I'm so happy that the beautiful Kate of Scathingly Brilliant has agreed to guest post for me! I've been reading her Blog for a long time and I'm always enchanted by her great pastel outfits and pretty drawings and cute things!
-Kati

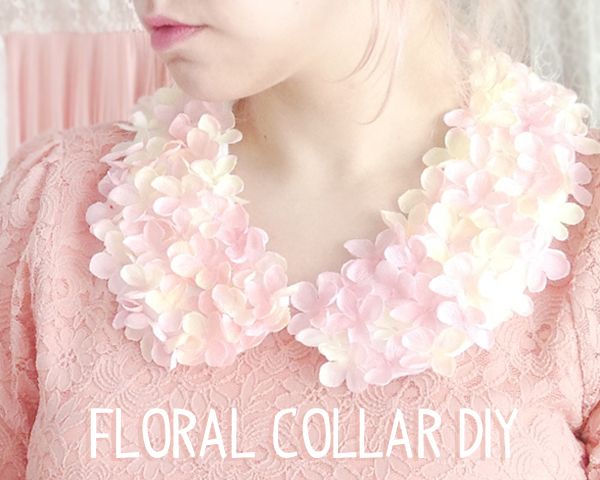
Hello Almost Stylish readers! My name is Kate and I blog at Scathingly Brilliant. For my guest post I thought I would share a little DIY project! This is a floral detachable collar, and it's really incredibly easy to make! You just need a decent amount of time and lots of patience to finish it! ;)
Materials needed: Felt, silk flowers, embroidery thread, a needle and pins

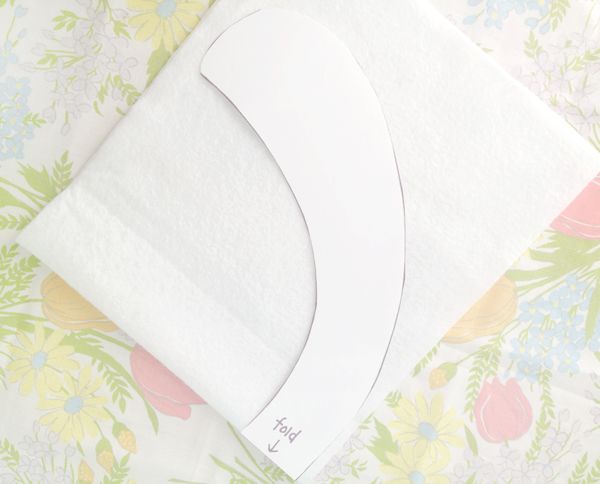
Step 1: Sketch out a collar template or trace a collar from a dress that you love. You only want to have half of a collar for your template. Fold your felt in half and place the collar template on the fold like I did in the photo. This way your collar will be symmetrical when you cut it out.

Step 2: Trace the pattern onto the felt and then pin around the outline so that the felt won't move when you cut it out.

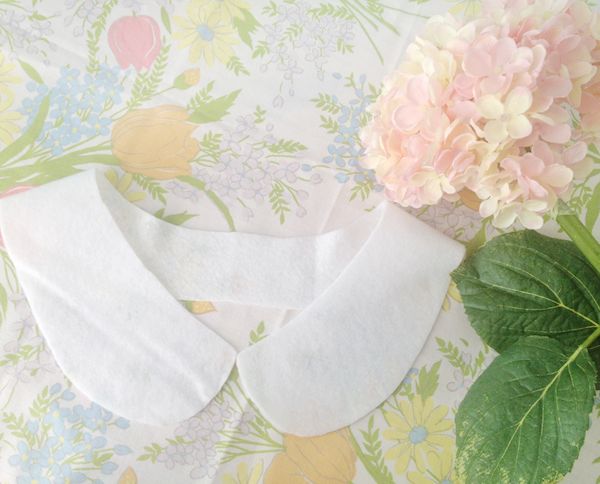
Step 3: Now cut out your collar. Then take your silk flowers and pull them off of their stems.

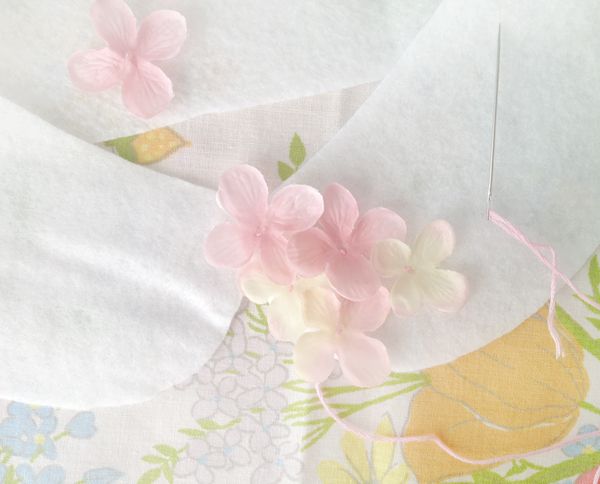
Step 4: Begin to attach the silk flowers using embroidery thread. I pull the needle up through the hole in the center of the flower and then put it back down on one of the petals to attach it.

Continue to attach the flowers until the entire outside of the collar is filled.

Step 5: Cut another piece of felt, and attach it to the back of your collar to hide the thread. You can use felt (or fabric) glue, or sew it on.

Voila! A pretty new detachable floral collar! :)
I'm so happy that the beautiful Kate of Scathingly Brilliant has agreed to guest post for me! I've been reading her Blog for a long time and I'm always enchanted by her great pastel outfits and pretty drawings and cute things!
-Kati

Hello Almost Stylish readers! My name is Kate and I blog at Scathingly Brilliant. For my guest post I thought I would share a little DIY project! This is a floral detachable collar, and it's really incredibly easy to make! You just need a decent amount of time and lots of patience to finish it! ;)
Materials needed: Felt, silk flowers, embroidery thread, a needle and pins

Step 1: Sketch out a collar template or trace a collar from a dress that you love. You only want to have half of a collar for your template. Fold your felt in half and place the collar template on the fold like I did in the photo. This way your collar will be symmetrical when you cut it out.

Step 2: Trace the pattern onto the felt and then pin around the outline so that the felt won't move when you cut it out.

Step 3: Now cut out your collar. Then take your silk flowers and pull them off of their stems.

Step 4: Begin to attach the silk flowers using embroidery thread. I pull the needle up through the hole in the center of the flower and then put it back down on one of the petals to attach it.

Continue to attach the flowers until the entire outside of the collar is filled.

Step 5: Cut another piece of felt, and attach it to the back of your collar to hide the thread. You can use felt (or fabric) glue, or sew it on.

Voila! A pretty new detachable floral collar! :)
- 1/28/2013 04:30:00 pm
- 35 Comments
Und die nächste in geselliger Gastblogger-Runde ist Maria von Avenue M - ihre Fotos sind immer wunderschön und verträumt, ganz abgesehen von ihren tollen Outfits. Zu gern würde ich mich aus ihrem Kleiderschrank frei bedienen können!
And the next guest blogger is Maria from Avenue M - her photos are always so beautiful and dreamy, and then there are her pretty outfits. I would love to just help myself from her wardrobe one day, ha!
-Kati
Hello 'Almost Stylish' readers!
How are you all today? My name is Maria and I am honoured to be guest posting for Kati here. She's always been a sweetheart to me, leaving lovely comments on my blog. Today I thought I would share with you a few snapshots of what I've been doing recently. A little bit of a 'photo diary' of the last few weeks. I hope you enjoy it and if you have time, it would be splendid if you would stop by my blog and say hello, I love making new friends!
I'm reading this marvellous book at the moment! I really enjoy the tv show (have any of you seen it? what do you think?), and thought it would be fun to read the novels too. This is the perfect holiday read.
This is my Aunty and Uncle's dog named Hozay! He is super friendly and adored the camera when I came to visit last weekend.
I wore this outfit to a picnic with my family last week. The little boater is one of my favourite accessories and I thought it went beautifully with this sequinned skirt from Asos. I felt very pretty that day :)
My friend Abbey and I spent the day roaming the streets of our local town and we went into a cute little cafe and they had the coolest wallpaper. The entirety of the rooms were collaged with old newspaper clippings, magazine articles from a long time ago and vintage photographs. It was so fun to read all of the old material while we waited for our food to arrive. ♥
There's been plenty of baking in our family lately! The top cupcakes are chocolate mud cakes with cream cheese frosting and the bottom cupcakes are banana with lemon cream cheese frosting. Both were marvellous to taste!
I am a huge fan of tea! These are my favourites.
I've been needing a new lamp for so long and as soon as I saw this I knew it was a dream lamp! It's such a pretty thing and lights up beautifully. It kinda reminds me of Jeannie from 'I dream of Jeannie' don't you think?
This is my favourite nail combination lately: a pretty peachy pink with gold sparkles over the top!
xx Maria
- 1/27/2013 04:30:00 pm
- 26 Comments
And the next guest blogger for this week is Rachel - I love her colourful style and beautiful photo backgrounds! This aside, she's also soo likeable and nice. So, quickly hop over to her blog!
-Kati
Hello lovely friends of Kati here at Almost Stylish, how are you this cold winters day (unless of course you are an antipodean then happy summers day to you!)
Whilst the poor Kati is recovering from her wisdom teeth romoval ordeal she very kindly asked if i would do a little guest post for her. Needless to say i jumped at the chance.
So, I'm Rachel.. nice to meet you! I blog over at my little corner of the world wide web called Rachel The Hat, where i mostly play dress up and show the world my outfits. What can i say, i guess i never grew out of the dressing up stage!;-)
So whats to know about me?
Well...
I am
A Hat wearing
Pattern Mixing
Bright Coat Buyer
Coloured Tights Enthusiast
With a love for retro prints
And peter pan collars
And sometimes i wear Trousers
Nice to meet you!
I am also a novice knitter, coffee drinking,Vintage lover, mama and wifey, Travel agent, shoe hoarder and general happy lady! But thats enough about me? How about you?! I would just love to meet you! Feel free to come on by my little online home Rachel The Hat anytime!
- 1/26/2013 05:00:00 pm
- 22 Comments
Eigentlich sollte hier ein Gast-Blogger schreiben, leider musste sie aber absagen - daher ein Post, den es eigentlich erst am Sonntag geben sollte! Zwei Neuzugänge in meinem Shop: das Plüsch-Wolken-Kit und schwarze Samt-Haarbänder!

Cloud Plush Toy Kit
Actually there was a guest blogger supposed to write today, but she had to cancel. So, here's what I actually wanted to publish on Sunday! Two new additions to the shop: the Cloud Plush Toy Kit and Black Velvet Turbans!

Black Velvet Turban
Heute gibt es auch ein Patch Kit eurer Wahl von KatinkaShop zu gewinnen! Alles, was ihr dafür tun müsst, ist meinen Blog zu verfolgen und mir in einem Kommentar zu verraten, welches euer Lieblings-Patch Kit ist - genau das bekommt ihr dann auch, wenn ihr gewinnen solltet!

Classic Elbow Patch Kit
Today you can also win a patch kit of your choice from KatinkaShop! Everything you need to do is follow my blog and tell me in a comment which patch kit is your favourite - and this is the kit you'll get in case you win!

Squirrel Patch Kit
Das Giveaway ist bis zum Donnerstag, den 31. Januar 2013 bis 24 Uhr GMT+1 offen und für jeden auf der ganzen Welt. Einen zusätzlichen Eintrag könnt ihr dadurch bekommen, indem ihr das Giveaway auf eurem Blog vorstellt! Viel Glück!

Cat Skirt Patch Kit
The giveaway is open until Thursday, the 31st of January 2013 until 12am GMT+1 and for everyone in the whole wide world. You can receive an additional entry if you share this giveaway on your blog! Good luck!
-Kati
KatinkaShop

Cloud Plush Toy Kit
Actually there was a guest blogger supposed to write today, but she had to cancel. So, here's what I actually wanted to publish on Sunday! Two new additions to the shop: the Cloud Plush Toy Kit and Black Velvet Turbans!

Black Velvet Turban
Heute gibt es auch ein Patch Kit eurer Wahl von KatinkaShop zu gewinnen! Alles, was ihr dafür tun müsst, ist meinen Blog zu verfolgen und mir in einem Kommentar zu verraten, welches euer Lieblings-Patch Kit ist - genau das bekommt ihr dann auch, wenn ihr gewinnen solltet!

Classic Elbow Patch Kit
Today you can also win a patch kit of your choice from KatinkaShop! Everything you need to do is follow my blog and tell me in a comment which patch kit is your favourite - and this is the kit you'll get in case you win!

Squirrel Patch Kit
Das Giveaway ist bis zum Donnerstag, den 31. Januar 2013 bis 24 Uhr GMT+1 offen und für jeden auf der ganzen Welt. Einen zusätzlichen Eintrag könnt ihr dadurch bekommen, indem ihr das Giveaway auf eurem Blog vorstellt! Viel Glück!

Cat Skirt Patch Kit
The giveaway is open until Thursday, the 31st of January 2013 until 12am GMT+1 and for everyone in the whole wide world. You can receive an additional entry if you share this giveaway on your blog! Good luck!
-Kati
KatinkaShop
- 1/25/2013 07:00:00 pm
- 31 Comments


