
Hanging Notepads DIY
5/04/2014 03:57:00 pm
Hängende Notizzettel, die man sich schnell rausreißen kann, sind praktisch für die Küche, den Schreibtisch...einfach überall! Man braucht: Schnur oder Kordel, Pappe, festes Papier, Papier für die Notizzettel, Musterklammern, Kleber oder Kleberoller, Stoffreste.

Hanging notepads you can quickly tear off come in handy in the kitchen, your work space...simply everywhere! You'll need: string or wool, cardboard, stiff paper, thin paper for the actual notes, split pins, glue or adhesive roller, fabric scraps.
1. Schneide das Papier für die Notizzettel zu. Ich habe ein A4-Blatt dreigeteilt, um lange Streifen zu erhalten.
1. Cut your notepad paper to size; I divided an A4 sheet into three sections so I got long strips.

2. Schneide jetzt die Pappe so zu, dass sie an den Rändern jeweils etwa 2 cm übersteht - oben können es auch gern 1 oder 2 cm mehr sein.
2. Now cut the cardboard so that it is about 2 cm wider than the paper on all sides except for the top where you can dd another 1 or 2 cm.

3. Nun die Pappe mit dem Stoff beziehen. Dazu die Ecken ausschneiden und mit dem Kleber bzw. dem Kleberoller hinten festkleben.

3. Now it's time to cover the cardboard with the fabric. Cut out rectangles at the corners and adhere to the back using glue or adhesive roller.

4. Nun das feste Papier auf die Größe der Pappe zuschneiden und auf die 'unschöne' Seite kleben, um die Stoffüberhange zu verdecken.
4. Now get your stiff paper, cut it to the same size as the cardboard and glue onto the 'not-so-pretty' side in order to cover up the fabric at the back.

5. Das Papier lochen, die Lochbreite auf das Pappstück übertragen und ebenfalls Löcher einbringen (mit dem Locher, einer Lochzange, einer spitzen Schere, was auch immer gerade da ist).
5. Punch holes into the paper, transfer the width of the holes onto your cardboard and also punch holes (with a hole puncher, pliers, sharp scissors, whatever is on hands).

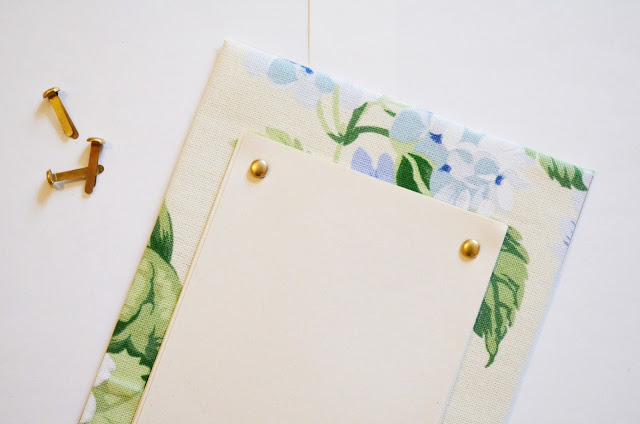
6. Nun das Papier mit der Pappe mithilfe von Musterklammern verbinden. Dadurch, dass das Papier mit Musterklammern festgemacht ist, kann man es auch immer wieder nachfüllen!

6. Connect the paper with the cardboard using split pins. This way, you can always refill your notepad when the original paper has run out!
7. Nun noch am oberen Rand zwei Löcher bohren/pieksen/wie auch immer und die Kordel durchziehen und hinten verknoten. Damit kann man die Notizzettel aufhängen und - ta-da!

7. Lastly, punch two holes into the top of the cardboard, pull the string through and make a knot at the back. Now you can hang your notepads - ta-da!


-Kati


26 comments
Oh das sieht echt süß aus <3 Werde ich auf jeden Fall mal ausprobieren :)
ReplyDeleteLiebe Grüße,
Elli
helloelli.blogspot.com
Was für eine süße Idee, ganz entzückend!!! Danke dafür!!!
ReplyDeleteGLG
Helga
Very creative and such a cute idea. Enjoy your Sunday doll.
ReplyDeletehttp://tifi11.blogspot.com
Really cuuute idea c: Love the floral background of it
ReplyDeleteas well ^__^ Xx
Such a lovely idea, and a very easy project! I love the fabrics you chose too!
ReplyDeleteHope you are happy and well!
Lots of kisses
Angelina - http://www.just-angelina.com/
This is so cute. I love how it turned out.
ReplyDeleteBeautetude
This would be so handy for hanging around my apartment! Adorable DIY as always :)
ReplyDeleteThe Dragonfruit Diaries
nice DIY notepads
ReplyDeleteSo süß... Deine DIY Sachen sind immer super, ich bin begeistert.
ReplyDeleteLiebst Minnja
www.minnja.de
Cute DiY!!
ReplyDeletebesos guapa!
Miss Soler
Oooh i just love this idea, its so cute and so simple!
ReplyDeleteHayfa
www.londonloafers.com
a very nice DIY!
ReplyDeleteHave a nice week!
This is the perfect Mothers Day gift, such a beautiful and very useful DIY! Thanks for stopping by...Wishing you a productive week ahead!
ReplyDeleteOh my word Kati this is my absolute, favorite DIY of yours - so elegant, simple and beautiful!
ReplyDeleteThis looks cute and neat :)
ReplyDeletehttp://lifestyle-selfie.blogspot.in/
OMG, i love this kind of Mother's day gift idea. So cute, i must steal your idea:). happy May :).
ReplyDeletehttp://www.attraction2fashion.com
Lovely idea, perfect mother's day gift!!!!!
ReplyDeleteKisses darling!!!
This DIY notepads looks adorable! Great idea and pattern!
ReplyDeleteThank you so much for following me back, appreciated so much ;))
Have a wonderful day <3
So lovely DIY
ReplyDeleteI love your post babe
Kisses
The Indian Savage Diary
I actually need that! What a brilliant idea, so functional and still look really pretty =D Thanks for sharing hun!
ReplyDeleteTake care always, love Christine ~ xo
www.chriissydollxo.com
BLOG | BLOGLOVIN' | TWITTER | FACEBOOK
Beautiful and so creative!
ReplyDeleteSuch a cute idea! Looks great!
ReplyDeletehttp://bellapummarola.blogspot.it/
Oh very cute DIY!
ReplyDeletexx
I want Invite you to my Giveaway! For win a Dress, Blouse or a Bag~ The winner choose the prize!
Love the floral fabric for the notepads! I will give it a try because I bet it would make my kitchen look prettier.
ReplyDeleteThe cat, you and us
süße idee :)
ReplyDeleteGrüße
So was brauch ich auch! ^^
ReplyDeletehttp://nagareboshi9.blogspot.ch/