
Chest of Drawers Makeover
6/19/2013 04:15:00 pmDieses praktische Schubladending stammt auch aus meinem Elternhaus und obwohl ich es so unendlich praktisch fand, fand ich es auch etwas hässlich, so wie es war. Wasserflecken sind nicht so meins. Ran ging's also ans Basteln!
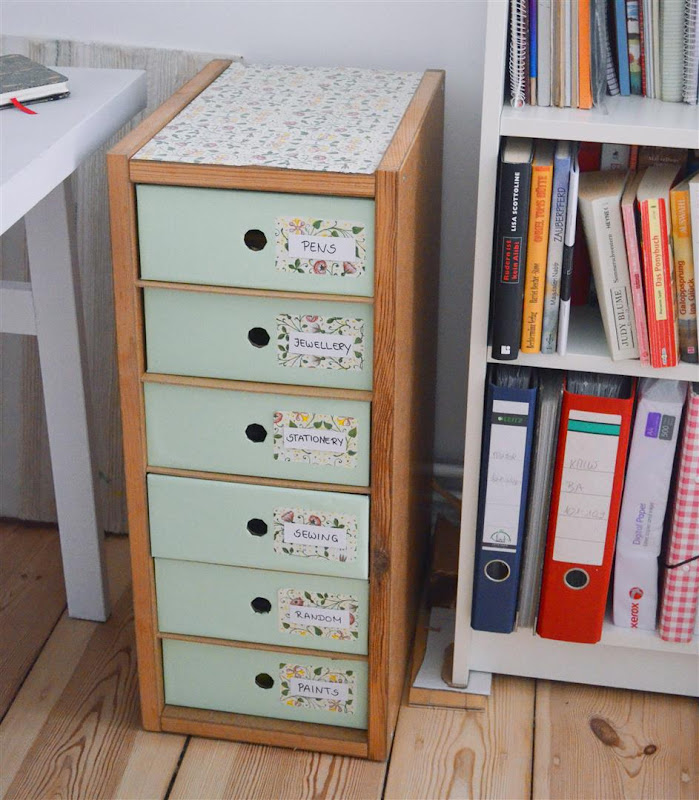
This very practical chest of drawers is also from my parents' house and even though I thought it was so incredibly handy, I also thought it was a bit ugly as it was. Water stains are just not my kind of thing. So I went ahead and got crafty!


Zuerst wollte ich die Schubladen einkleiden. Dazu die Vorderseite auf ein Blatt Papier legen und die Umrisse sowie das Loch nachzeichnen (schwarze Linien). Dann die Linien verlängern und wegschneiden (im Bild die roten Linien).
Firstly I wanted to cover the drawers. To do this, I put the front onto a piece of paper and drew around the outside as well as the hole (black lines). Then extend the lines and cut away (the red lines in the picture).


Jetzt die Vorderfläche auf die Schublade kleben und darauf achten, dass die Löcher übereinander sind. Das eingeschnittene Papier nach innen biegen und mit Klebeband befestigen - wie man sieht, habe ich dazu die Schublade auseinandergefaltet, damit ich besser rankomme.
Now stick the paper onto the front of the drawer and make sure that the two holes are aligned. Fold the cuts in the paper inwards and adhere with tape - as you can see, I unfolded the drawer a bit for that so I could reach it better.


Jetzt alle Seiten festkleben.
Now adhere all the sides.

Die Oberfläche habe ich mit einem Rest Geschenkpapier beklebt, den ich mal von meiner lieben Schwester bekommen habe. Die überstehenden Enden mit einem Cuttermesser wegschneiden.
I covered the surface with a bit of wrapping paper that I had once gotten from my beloved sister. Cut away the excess with a stanley knife.


Zuletzt habe ich aus dem überschüssigen Geschenkpapier sowie laminiertem weißen Papier kleine Schildchen geschnitten. Die weißen Labels beschriften und mit doppelseitigem Klebeband befestigen - so kriegt man sie wieder ab, sollte man umsortieren!
At last, I cut labels from the left over wrapping paper as well as white laminated paper. I labelled the labels (ha!) and adhered them using double sided tape - if I ever want to reorganise the chest of drawers, I can easily remove them!


Und fertig! Ein fast neues Schubladenregal für nur ein paar Cent!
And done! An almost new chest of drawers for almost no money!
-Kati


38 comments
fabolous dear...great idea
ReplyDeletexoxo
★ Vendy ★
★★★ NEW POST ★★★
follow me on:
The simple life of rich people BLOG
OMG! Great idea! Lovely blog, would you like to follow each other?
ReplyDeleteHow cool!
ReplyDeleteYou are so resourceful, I never would have thought of that!
Rachel
This comment has been removed by the author.
ReplyDeleteSo cute! VERY cool! :)
ReplyDeleteMika
www.sparrowshaven.blogspot.com
They look amazing x
ReplyDeleteWhat a cute DIY idea! I've been revamping my bedroom decor lately so I loved reading your post for more ideas :)
ReplyDeletexx Debbie
www.whatdoffydoes.blogspot.com
Great idea! kisses.
ReplyDeletehttp://www.solaanteelespejo.blogspot.com.es/
great DIY it's so pretty!!
ReplyDeleteThanks for comments! Lovely look!
ReplyDeletehttp://afinaskaterblogspotcom.blogspot.ru/
Another adorable DIY! I can't believe how good you are at these :)
ReplyDeleteTrendy Teal
You are amazing in how you could take something old and make it new again and so unique.
ReplyDeletehttp://Tifi11@blogspot.com
great idea :)
ReplyDeleteThat is super cute!
ReplyDeletexoxo,
Laura
http://lauraisthriftingthroughlife.blogspot.com/
You have totally transformed this chest of drawers into something so pretty and functional. Wonderful DIY!Thanks for your kind visit doll, hope your week is going well :)
ReplyDeleteThis is amazing darling, amazing!!
ReplyDeletecaughtinvogue.blogspot.com
This is such a cute DIY and love the final result so much! The color looks so perfect along with the floral pattern :) xo akiko
ReplyDeleteStyle Imported
What a great DIY! It looks lovely :)
ReplyDeletexo Anouk
www.keysofanouk.nl
Oh wow, what a transformation! :)
ReplyDeleteRosie x | Every Word Handwritten
What a simple DIY that made a HUGE difference! It turned out so pretty :) great job!
ReplyDeleteJessi
haircutandgeneralattitude.blogspot.com
wow nice makeover!!! You did a great job :)
ReplyDeleteThe waraping paper is lovely !! xx
You did such a wonderful job! This is so very cute. I wish I were as crafty as you!
ReplyDeletexo
Ashley
Southern (California) Belle
The result is so cute, I love it!
ReplyDeleteAh this looks so good. You're super creative :)
ReplyDeletehttp://saltskinned.blogspot.com.au
Whoa! Love the makeover! The floral pattern looks awesome!!! :)
ReplyDeleteFASHION PANACHE BLOG
Google Plus | Bloglovin | Networked Blogs | Facebook | Twitter | Pinterest
schönes makeover :) sieht sehr gut aus!!
ReplyDeleteWow! ist total gut geworden. Jetzt habe ich auch wieder Lust bekommen was an meinem Zimmer zu verändern :D Dein Blog is wirklich süß :>
ReplyDeleteSchau doch auch mal bei mir vorbei, ich würde mich über deine Verfolgung freuen, wenn dir mein Blog auch gefällt :>
Liebe Grüße
http://lovesoundsgood.blogspot.de/
Wow, great job! Looks great!
ReplyDeletexoxo
www.its-dash.blogspot.com
great job, love it!
ReplyDeletexx
http://losaway.blogspot.com
Wow, super cool ;)
ReplyDeletewww.charmeusee.blogspot.com
the final result is amazing!
ReplyDeleteNameless Fashion Blog
Nameless Fashion Blog Facebook page
It looks fantastic! ;)
ReplyDeletewow! I love doing DIY's and recycling! It looks great! <3
ReplyDeletexx
https://www.wastedyouthwithyou.blogspot.com
this is great! you are great and skillful. Love doing DIY's myself :)
ReplyDeleteHope you enjoy checking out my DIY Neon pumps :) As it was my first time
http://whisperingstyle.blogspot.com/2012/04/diy-neon-pumps.html
Have a great day dear!
Elsey
Oh wow, this looks amazing! What a transformation!
ReplyDeletewww.room-334.blogspot.com
WOW! Great idea!
ReplyDeleteBest wishes!
Elena
GIVEAWAY to my blog vgolove1.blogspot.ru
This is adorable!! I love the paper you used!!
ReplyDeleteMackenzie
www.heybirdfriend.com
Nice idea! Love it :)!
ReplyDeletewww.alpenglowsummit.blogspot.com